Grammarly Chrome extension is free to install and can come in handy to check for errors without installing the Grammarly app separately.
In this guide, I’ll share a detailed step-by-step guide on how to install Grammarly Chrome Extension along with a troubleshooting method (in case it starts acting up).
Let’s get in!
Quick Tutorial
Visit here > Click on Add to Chrome > Confirm > Login
How to Install Grammarly Chrome Extension: Step-by-step guide
Setting up the Grammarly Chrome extension is like child’s play. And you can install it by following the steps mentioned below:
Step #1: Click here to land on the Grammarly home page.

Step #2: Click on the ‘Add to Chrome ‘tab on the top right corner of the page. (see image below)

Step #3: On the new page, tap on the ‘add to Chrome’ option as shown in the picture below.

Step #4: Confirm adding the extension, and you can now start using it.
Features Of Grammarly Chrome Extension
Grammarly Chrome extension has the following features:
- Real-time spelling, grammar, and punctuation checker
- Analyze your work for readability, tone, and clarity, and offer suggestions to improve your writing.
- The vocabulary enhancement feature suggests synonyms improve writing tonality.
- Grammarly ensures your text does not have copied content with its plagiarism checker.
- Generative AI feature to get instant answers and ideations
Do you know💡: Grammarly has introduced plenty of new features such as AI enhancement, Grammarly AI detector, and Writing reports.
Using Grammarly Chrome Extension
You don’t need to do anything specific to start using the Chrome extension. It automatically starts working when you open work on Google Chrome.
The following are a few examples of best Grammarly use cases, but please remember that these are not the only options; you can use the extension on as many applications as you want.
- Use it for writing amazing emails
Grammarly Chrome extension for Gmail can help you with that. Whether you’re copy-pasting or crafting a new email, it automatically detects the errors and offers suggestions.
In addition, the new generative AI feature also allows you to reply to emails directly with AI instead of manually typing them.
Explore more about how to use Grammarly on Gmail with our detailed guide.
- Use it for Google Docs
Grammarly for Google Docs is widely popular and used by thousands of people. You can directly use it on Google Docs and make the changes right there.
Once you install the extension, you’ll see the Grammarly logo popping on the right side of the doc, and it automatically starts analyzing your text against all possible errors.
- Use it for Messaging Apps
The Grammarly Chrome extension works for messaging apps like Slack, WhatsApp, etc. This is beneficial, especially for formal communication over these messaging channels.
Texts full of spelling and grammar errors do not leave a healthy impression on the opposite person. Grammarly will make sure you don’t have to feel embarrassed about bad grammar by constantly pointing out errors.
- Use it on Social Media Platforms Like LinkedIn & Medium
If you’re creating content for LinkedIn and Medium, using the Grammarly Chrome extension will come in handy. It will ensure that your posts don’t bear any semantical or syntactical errors.
Grammarly Chrome Extension Not Working: Tips to Resolve The Issue
Lately, Grammarly’s Chrome extension has been giving me trouble. I noticed how it starts lagging, or sometimes, it doesn’t even work mostly on Google Docs.
Besides, I noticed how my Chrome started lagging because of the extension. Therefore, I researched the ways to fix it.
If you’re having trouble using Grammarly’s Chrome extension, here are a few solutions you can check out:
- Note that the Grammarly Chrome extension doesn’t work in incognito mode.
- Double-check your internet connection
- Re-load the website
- Try clearing the Chrome cache
If all of these fixes do not work, make sure to reinstall the extension.
Reinstalling it removed the bugs for me, but I can’t use Grammarly through the extension everywhere.
How to Uninstall Grammarly Chrome Extension?
The way to add the Chrome extension for Grammarly is just a few clicks, so removing it is easier, too!
There are two ways to do so.
- Remove by Visiting The Store
You can click on this link > click on “Add to Chrome” > Click on “Remove extension.”
That’s it! Your Grammarly extension is now removed.
- Remove From The Extension Bar
If you don’t want to visit the store, you can follow these 3 simple steps to uninstall Grammarly’s Chrome extension.
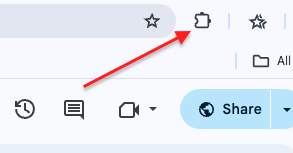
Step 1: Click on the extension tab in the top right corner of your browser window.

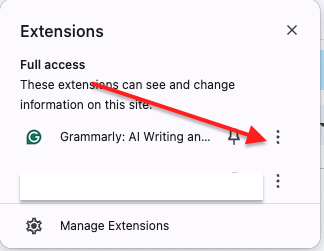
Step 2: Click on the three dots next to Grammarly.

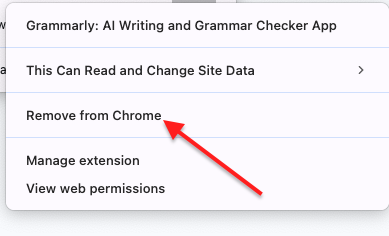
Step 3: Now, select “Remove extension.”

That’s all! The extension is now removed.
Related reads:
Concluding Thoughts: Add Grammarly to Chrome Easily
Grammarly for Chrome is actually one of the easiest ways to use Grammarly literally everywhere.
Grammarly will be automatically enabled everywhere you type, saving you the time and hassle of visiting the app or web.
You can use the methods given above to install the Grammarly extension on Chrome and also use the troubleshooting tips whenever it gets stuck.
Need additional help? Feel free to comment on your queries in the comments section below!
FAQs
Yes, the Grammarly Chrome extension is completely free to use.
Yes, the Grammarly Chrome extension is available on mobile, but with some limitations.
Yes, the Chrome extension is very accurate. However, it’s always better to proofread your text before submitting it.
Yes, the Chrome extension is safe and compliant with HIPAA security, breach, and privacy notification rules.


